Setup of employees
This guide will walk you through how to set up employees leave, flextime, public holidays and absence correctly. Click on any item in the table of contents to go to the specific paragraph.
You can also download this guide as a PDF.
- Preparation
- Setup of employees
- Leave – earning – spending – starting balance
- Flextime – calculation – starting balance
- Sick leave – register for employee
Preparation
To begin the setup of employees, you first need to invite them to use TimeGuru. If you haven’t already done this, you can invite new users from administration -> invite new users. Press “Ctrl” before you click on the link to open in a new window.
If you want your users to be attached to a department, you can create them under administration -> department first.
If you want to attach a cost element to a user (cost and/or sales price on access level), you can create them under administration -> Cost element first.
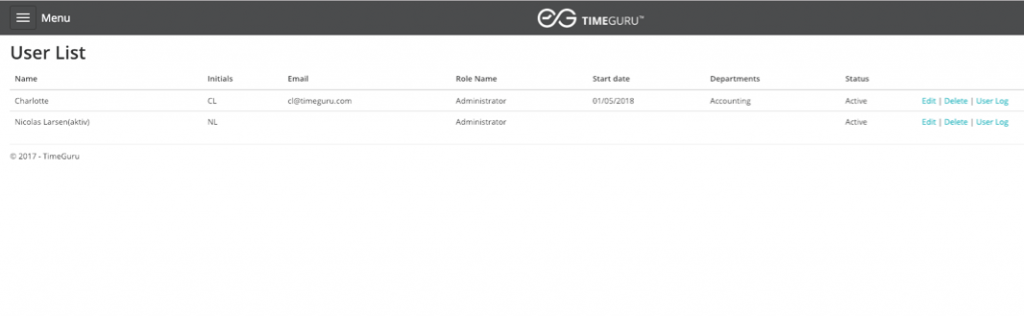
When the preparations are done, you can go to the user list (Figure 1) that you find under administration -> users. The user list is the baseline for the next paragraph.
Proper setup of employees
This guide walks you through how to set up your employees in TimeGuru. Including how to set up earn – and spend periods for leave and how to calibrate leave and flex time starting balances.
Before you move on, you can profitably click the edit button next to a user, so you are ready to fill out the boxes.
Many of the boxes are self-explanatory, but here is a list with short explanation of all the boxes, followed by a further explanation below.
- Screen name is used in the system if the full name takes up too much space
- Start date indicates the date of employment for the employee
- End date is only used in connection with time-bound employment
- Calculate flextime from indicates when the time registration starts
- Work hours per week is the weekly worktime
- Corporate email is used if the employee has multiple email addresses
- Department is used, among other things, for reports and planning
- Cost element is used if you wish to attach a fixed cost – and/or sales price on an employee
- Status must be active if the employee needs to be able to log in
The box start date
This box indicates the employee’s date of employment that is used in relation to calculation of leave. Example: If the employee has earned full vacation for the leave period that is earned in 2017 and is spent 1 May 2018- 30 April 2019, the start date must be 1 January 2017 at the latest. Employment in the middle of the earning period will result in fewer earned leave days, as the standard earned leave is 2.08 leave days per month.
You can create leave and furlough yourself, so it matches the company’s agreements. The leave module is flexible and supports everything from control of leave, to special holidays for earning of education etc.
The box calculate flextime from
In this box, the date from where the employee begins to register time is added. If the employee works full-time, meaning 37 hours per week, 37 hours must be registered to make the flex balance hit 0.
For a normal work week of 37 hours, an employee must register 7,4 hours daily for the flex balance to remain the same.
See more details about flextime calculation and calibration of start balances in the paragraph “flextime.”
The box work hours per week
This box indicates the standard time per week. Ergo the agreed weekly work hours. If the standard is set to 37 hours per week, employees must register 37 hours per week to make the flex balance remain 0. If the registered hours exceeds 37 hours, the flex balance increases and vice versa.
Access level
There are three different access levels in TimeGuru:
User has access to registration in the worksheet and overview of personal reports and statistics. Here among flextime and leave reports in real-time. Users only have access to data regarding themselves.
Superuser can operate across the system and set up most of the master data that is used on a daily basis. This role is typically assigned to leaders or HR-employees who needs access to work hours, leave and statistics of leave across the company.
Administrator has further access to change the basic settings in the system and invite new users. The person who creates the system will automatically become administrator.
Cost element
If you attach a cost element to an employee, the underlying cost – and/or sales price will automatically be saved with time registrations and planning. The prices will also be included in reports and can be used in invoices. Prices are also manageable in combination with project -or activity prices, as these prices are higher prioritised than employee-prices.
Earned and spend leave
The leave module is very flexible and can therefore be set up to all types of earned and spend leave, furlough, education, senior days and so on.
Earned and spend leave can be set up for the entire company, employee groups or individually. This can be relevant if for example there is multiple agreements or other special agreements.
The leave module is not used for registering sickness. See the paragraph on sick leave for further information.
Creating leave types for earned and spend leave
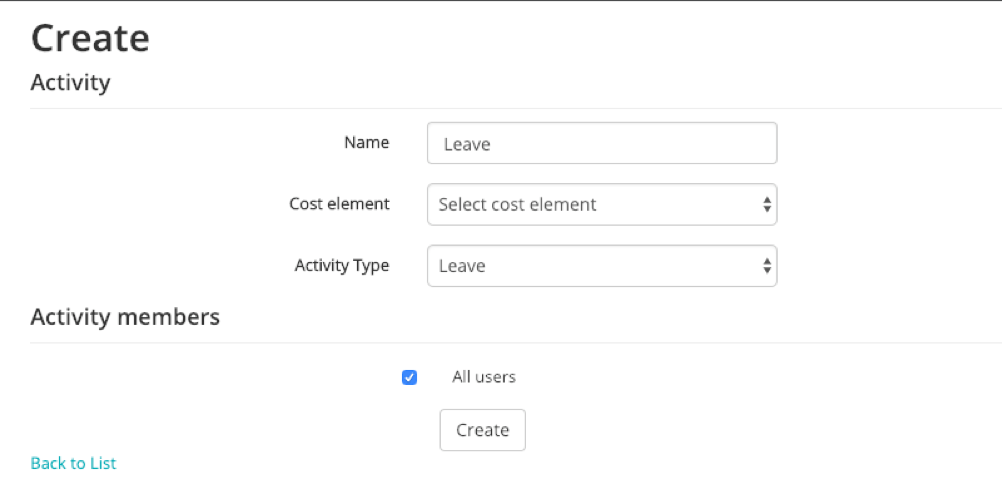
First, we need to make sure there is an activity for leave registration. The purpose for this activity is to hide leave registration in the time registration when it is not in use.
If you have yet to create the activity for leave registration, you can do this under administration -> activities. Fill out the registration as showed in Figure 2. Choose a fitting name and perhaps attach a cost element to follow your wage- and/or operational costs for leave.
Now we’re ready to create Leave.
Example: we want to create earned and spend leave for “Leave” for the leave period 2018/2019. For this leave period, the following applies:
- The earn period is from 1 January 2017 to 31 December 2017
- The spend period is from 1 May 2018 to 30 April 2019
- Earned leave per month is 2,08 days = 25 days yearly
- All employees have the right to the leave type “Leave”
To create the above mentioned as a new leave setup, go to administration-> leave setup. This leads to a list of already existing leave setups. Click “create new” and fill out the boxes as shown in Figure 3.

Note, that in the last box you can choose the newly created activity for time registration. If the list of activities is empty, make sure that you have created an activity with the activity type “leave.” (See Figure 2 – create an activity).
Click “create” to create the leave type. Now you can use this in time registrations and follow earned and spend leave in reports and in the dashboard.
Calibrate starting balance on leave
It is rare that all starting balances is 0 when switching to a new system. Therefore, you will typically calibrate all employees’ leave balances with already spend leave.
The easiest way to do this is to register the spend leave the day before you want the employee to register time.
Example: An employee is set to calculate flextime from 1 January 2019, which is also the date the registration begins. The employee has already spent 18 out of 25 of his leave days.
Now we want to regulate the spend leave days without affecting the flextime balance. This can be done if the employee registers 18 days x 7,4 hours = 133,2 hours on the leave type “Leave.” The registration date must be set to a date before the beginning of the flextime calculation, for example 31 December 2018. (7,4 hours is the standard workday for a 37-hour workweek).
Calibrate leave as shown in Figure 4. Customer and project are visible and should be filled out based on the chosen system setup. It is important to register on the correct day and choose the activity “leave” and afterwards choose the reason. In this example, the reason is leave, but it might as well have been public holiday, furlough or other.
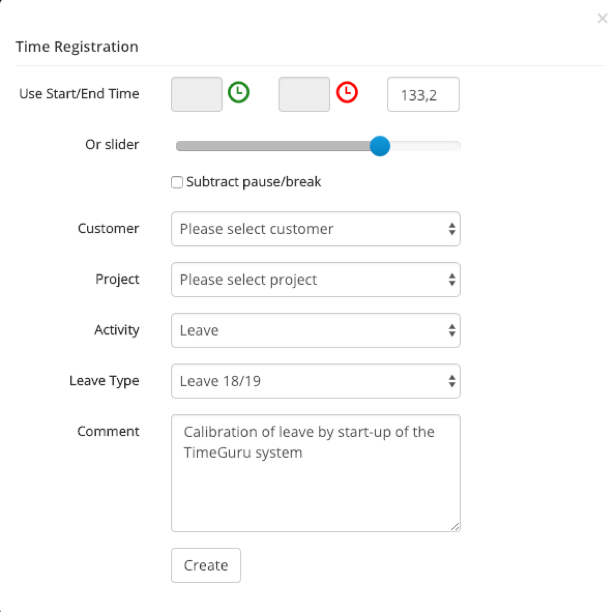
Click “create” to save the correction. If the correction is to be done by an administrator, use Administration -> Admin worksheet the same way as shown in Figure 4. Though with the addition that you can choose between the users.
Reports for overview on the employees’ leave
All employees have access to statistics on their leave in their personal dashboard. You can either click on the TimeGuru logo on top of the page or on the menu button My dashboard, where you’ll find the overview of the statistics.

A Superuser or an Administrator can see the leave statistics for all users in the report Reports -> leave and vacation. You can filter by department and leave type.
Time registration on leave
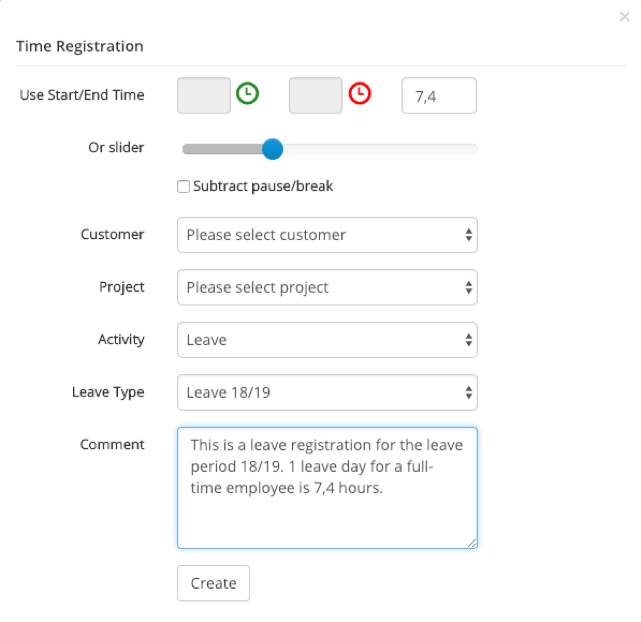
When an employee registers their leave, there will typically be an activity called “leave” that is chosen, and afterwards one of the different leave types. You can create and name these types yourself, so they can vary depending on your company’s needs. REMEMBER that employees must register the number of hours equivalent to a standard leave day, which typically is 7,4 hours for a full-time employee.
A typical leave registration will look like Figure 5 – leave registration. When the leave day is registered, it is included in the flextime calculation. This way, the registration of a full leave day will leave the flex balance unchanged. On the other hand, a registration of only half a leave day will require a registration of half a workday as well for the flex balance to remain the same.
Flextime
This is how we calculate flextime
Flextime is calculated from that day the employees is set up to calculate flextime from, which we looked at earlier. From this date (including the date) the employee must register a day norm daily for the flextime balance to remain 0. A day norm for a full-time employee will typically be 37 hours/5 days = 7,4 hours a day.
Every day begins with minus one day norm and will be accurate when the employee has registered their daily work hours. Example:
Today is Thursday, 4 March and I am set up to start flextime calculation on 1 March. This means that by now I should have registered 4 x 7,4 =29,6 hours for my flextime balance to remain 0.
I have registered following Monday-Thursday:
Monday: Work 7 hours
Tuesday: Leave day 7,4 hours (registered as a day norm if it’s a full leave day)
Wednesday: Public holiday (is automatically counted as a day norm on 7,4 hours for a full-time employee)
Thursday: 8 hours
The total registered hours, including the special holiday, is:
7 + 7,4 + 7,4 + 8 = 29,8
This leaves us with a flextime balance on: 29,8h registered – 29,6 norm = 0,2h
Sometimes you need to register time that will not affect the flextime balance. For example, if there’s a group of employees who doesn’t have flextime. You can do this by creating special activities that is set to not count in the flextime balance.
Calibrate starting balance for calculation of flextime balance
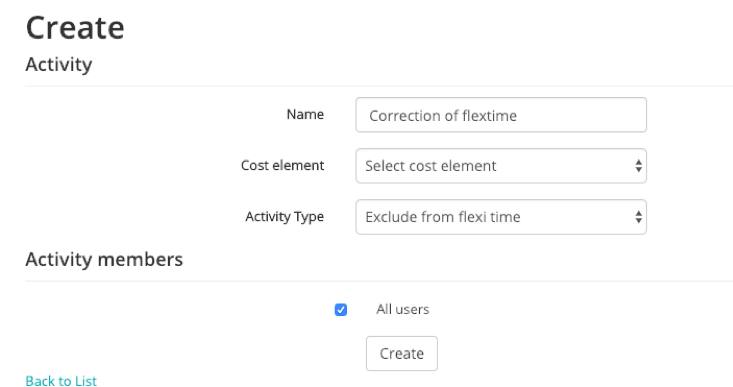
You can frequently meet the need to calibrate the flextime balance for an employee. For example, in connection with payment or to reset the hours. Therefore, it is a good idea to create an activity called “correction of flextime” that can be used continuously for this purpose.
The employee can calibrate their starting date themselves in the worksheet or an administrator can choose the starting date in the menu Administration -> admin worksheet. The important thing is to do this earliest the same day as the employed is set up to flextime balance. Otherwise the correction will be left out of the calculations.
If you already have an activity for correction of flextime, you can skip this step. Otherwise we recommend you create an activity for flextime correction under Administration -> Activities and fill out as shown in Figure 6.
Now it is time to type in the correction of the employee via Administration -> Admin worksheet. Choose the employee in the list at the top and afterwards go to the start date and fill out as shown in Figure 7.

Now you have transferred the flextime balance to the new system and the employee can now follow their flextime on a daily basis.
Handling the public holidays regarding flextime balance
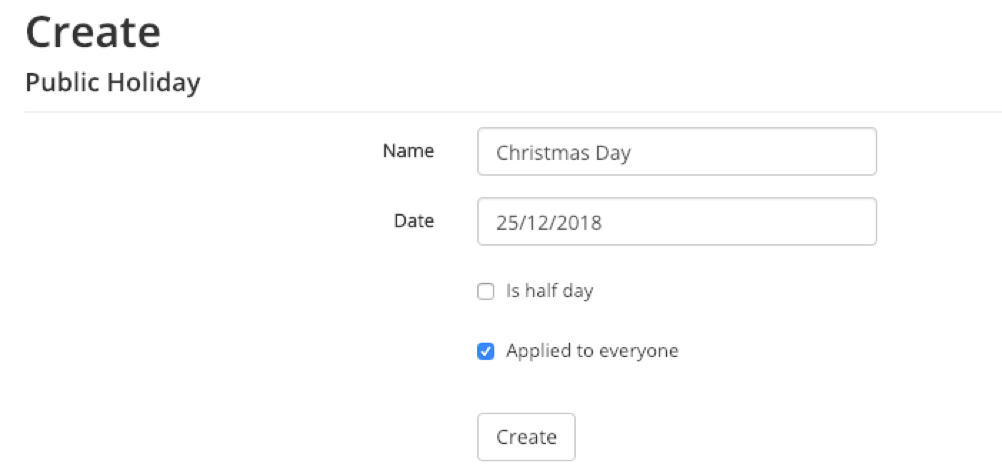
Public holidays are created in the system under Administration -> Public holidays. You can choose if the public holiday applies to all employees or only specific groups. For example, employee-groups with different agreements.
Example: Everybody has a public holiday 25 December. Therefore, Christmas day is created as shown in Figure 8.
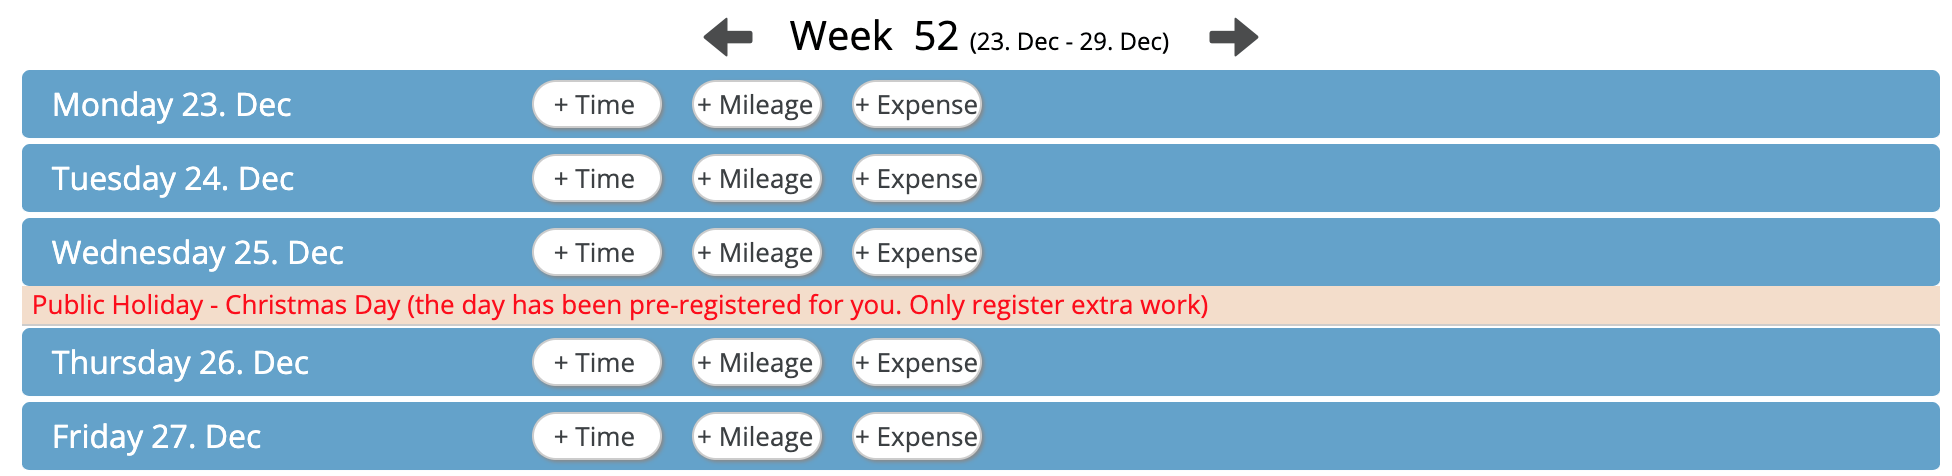
When the public holiday is created, it will automatically appear on the concerned employees’ worksheet, as shown in Figure 9. Note that the employee shall not register time on public holidays, as the system already incorporates these in the calculation automatically.
Reports for overview on employees flextime
Employees are able to follow their own flextime balance in real-time in the personal dashboard.
Administrators and superusers has access to reports -> flextime, where you can pull statistics across the company.
The report will always show the current balances but will also give you the possibility to compare the development between two dates. This makes it easier to check if employees build up a high number of flextime hours that are expected to be used in the future. Conversely, if the employee owes the company a lot of hours and what direction the development is heading.
Sick leave
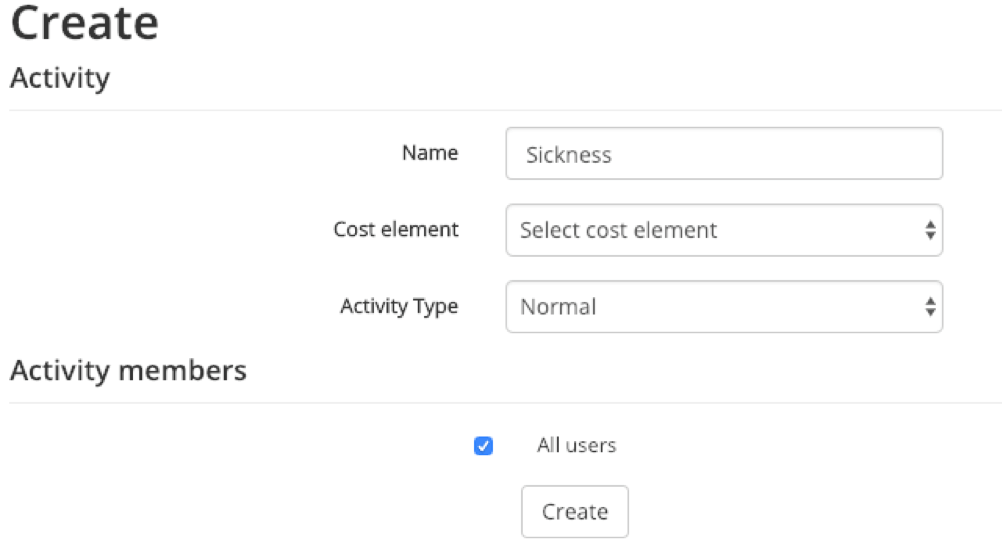
Setup of activity for sick leave registrations, that are used for sickness and other absence, are typically registered on activities for that specific purpose. If you already have activities for sickness and absence, you can skip this step. Otherwise we recommend that you create these under Administration -> Activities and fill it out as shown in Figure 10. Create the activities you find necessary. For example “sickness”, “child’s first sick day”, “other leave”.
When the activities are created, the employee can register their sickness themselves or a superuser/administrator can do it for them. The employee can do it themselves in the worksheet and the administrator can do it in the Admin worksheet (Remember to select employee). Fill out as shown in Figure 11.
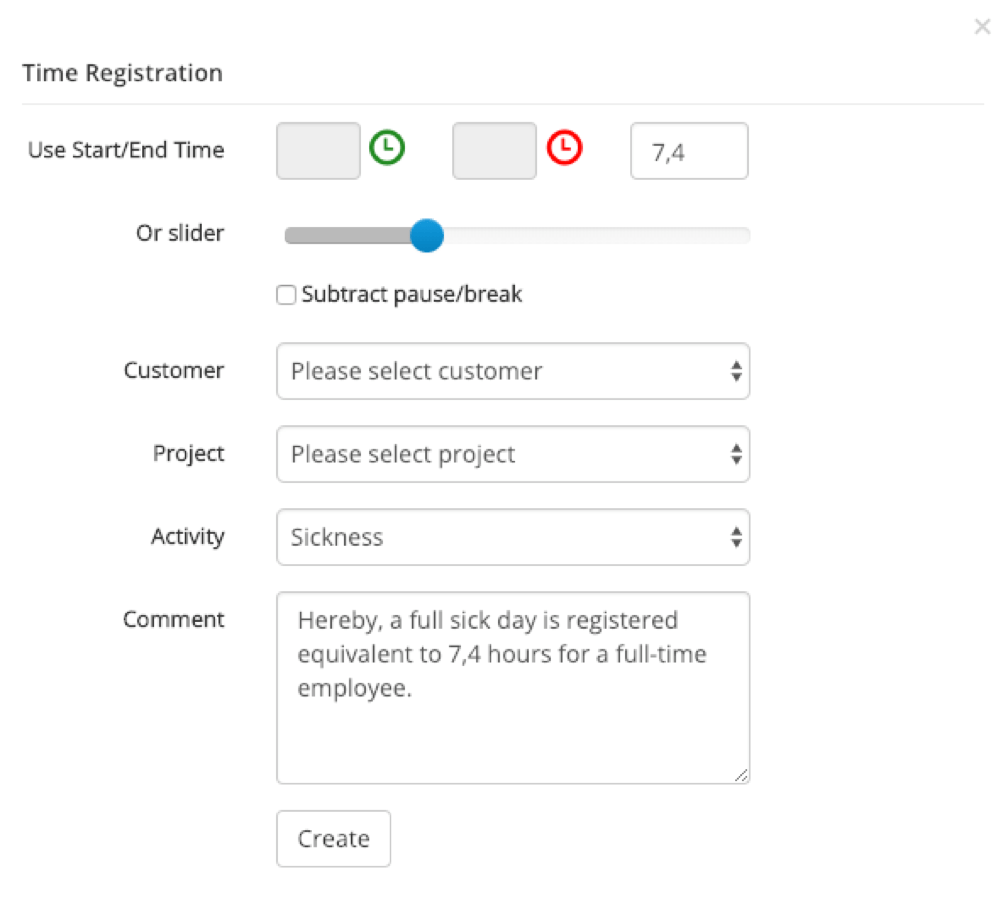
Above there’s one day sickness registered. The registration serves multiple purposes: 1) It is calculated into flextime, so the flextime balance remains accurate and 2) It is included in statistics on sick leave that can be pulled out of the system as a report.
Report on sick leave
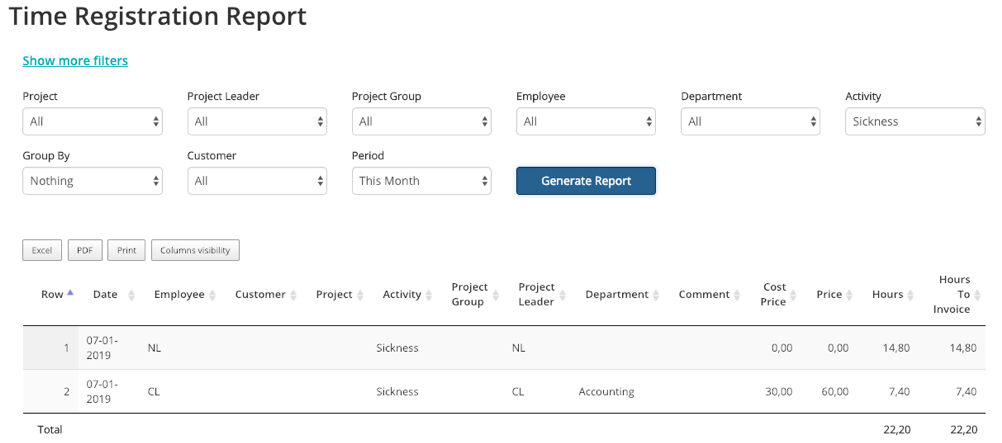
Go to reports -> time to pull a report on sick leave. The report includes multiple filters and grouping options. The filters define what data is shown in the report. For example, if you only want data from a specific period or department. Or in this case, where we only want data from the activity “sickness.”
Example: we want a report on the total amount of sick leave from the current year, grouped per employee. Click on “show more filters” and fill out as shown in Figure 12. If the system is set up to use cost – and sales prices, this is shown in superusers and administrator time reports. Prices are hidden from normal users.
Hereby ends the walk-through of employee setup and transmission of starting balances. Now you are ready to begin with time registration.