Request Vacation from Dashboard
From your dashboard, you can request vacation and your leader can approve it. Read More
From your dashboard, you can request vacation and your leader can approve it. Read More
It’s very easy to get TimeGuru on your iPhone. All you have to do is follow these 5 simple steps. Read More
It’s very easy to get TimeGuru on your iPhone. All you have to do is follow these 5 simple steps. Read More
If you have recently been invited to TimeGuru and logged in for the first time, or if you just want to be familiar with all the functions, this is the guide for you.
There are 4 menu items to choose from (click to go to the description of the specific item):
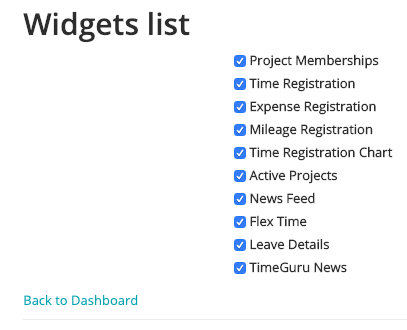
My dashboard is the first item in the menu. The dashboard will show you statistics and status in real time. You can activate and deactivate the information you wish to see by clicking the […] button in the top right corner. You can chose to see the following widgets/informations in your cockpit:

The dashboard settings are self-explanatory. You can click this box to enter the settings.
Project memberships – Counts how many active projects you have.
Time – Sum of the current week- and months’ time registrations.
Expense – Sum of private expences for the current week and month.
Mileage – Sum of mileage for the current week and month.
Flextime – Your current flextime balance (every day will start in a minus and will return to zero if the day is registered as a daily norm).
Hour Bank – Your current balance in the hour bank (typically with saved time from agreed/ordered overtime).
You can also see news that your company publishes in your system. You can choose for yourself what you want to see in your dashboard.
Leave details – Status on all the active leave types you are assigned to:

Time registration – Bar charts for a quick overview of the current week:

Request – Request vacation/conduct/transfer/payment, hour bank conduct/payment and more. Follow status and leader approval:
BILLEDE?
Your projects – Project list with project details

Leader approval (only available for leaders and administrators)

As mentioned earlier, your personal dashboard can be adapted to only show you the elements that you need. We will discuss this in detail further down in the guide. Below you can see an example of a dashboard.

You can select and deselect elements depending on your needs. To open the settings, go to the Menu item “My dashboard” and click the […] icon on the top right corner. Now you can select the widgets/informations that you would like to see (as shown below).
In the worksheet you register your time, mileage and expenses. Time registration is also used to register vacation, sickness and other types of leave. Depending on your company’s system setup, there can be a difference between options and mandatory boxes.
Feel free to also read our guide to the worksheet that go into detail about registration of work, vacation and leave.
We have also created a review of the time registration module if you wish to further educate yourself on the many options in the module.
You can register time multiple ways. You can either use the start/end time. Or you can manually type in the hours. For example 7,4 hours that are the equivalent to a normal workday based on a 37hour workweek.

Figure 3 – Register time three ways
Important: When you register sickness or leave for a full workday, it is not necessary to to type in hours. The system will get the information from your daily norm settings.
You can also register leave with auto-registration, it is the red box in the right side of the worksheet.

Figure 4 – Ongoing registration
You can choose start time and fill out the mandatory boxes while letting the end time remain empty. Afterwards you can just click end when you are done, and the system will calculate the time for you (as shown in figure 4).
If needed, you can subtract breaktime from your registrations (figure 3). Just type in the time of your break in minutes, and the system will automatically subtract it from your registration.
If this is a part of your system’s settings, you can also attach a customer to the registration or choose if the registration is internal.
If you are assigned to any projects, you can attach one of them to your registration as well. You can use this in reports for instance, to see how much time you spend on the different projects.
In activities, you can choose between those that are created in the system. This can be both billable and unbillable, and more specific activities depending on your system.
Lastly, you can add a comment to your registration. You can specify what work you have done in that time, or type in other important information.
In the bottom of the page you can see weekly statistics.

Figure 5 – Weekly statistics in the worksheet
Each customer has their own colour. The statistics show you the number of workhours registered in the current week. This makes it easy for you to make sure that you work the right number of hours and it also gives you an overview of the different customers and how much time you spent on each of them.

Figure 6 – Shift between the weeks
On figure 6 you see a calendar. You can use this to go back and forth in the worksheet. You can also use the arrows to go back and forth one week at a time. To go back to the current week, simply click the home button.
In reports in the menu you can choose between 4 different options.
Mutual for all the reports are that they give you a quick overview of your personal statistics. You can download the report as a PDF or an Excel file.
The time registration report will show you statistics on all the time registrations you have created during a specific period of time. You can choose between many different filters that will indicate what information will be shown in the report.
Project can be used if you want to know how many hours you have spent on different projects.
Project leader will make the report even more specific. Same goes for project groups.
You can also sort between the different activities, to see how your distribution of time is regarding the different activities. This is a big plus if you for example distribute your own workhours.
Groups can provide you a list of customers or projects for example. Every item gets its own column, so that you can see the different information for each in the different categories.
Customer will show you one customer in the report with the different information you have selected.
Period defines the period you want to pull a report from. 1) This week, 2) last week, 3) this month, 4) last month and so on.
When you have chosen the filters you need, just click generate report.

Figure 7 – Time registration report
Now you can see all the different information, here among project, department and comment. It’s not necessarily all the information that is relevant for your report.
Example: If you with the filters choose to pull a report on a specific customer, it is not necessary to have the subject “customer” in the report, as you already know the report is only regarding that one customer.

Figure 8 – select and deselect information in the report
Figure 8 shows you a list of all the different information that you freely can select and deselect in the report. The green colour indicates that the box is selected and the grey indicates the opposite. When you have chosen the information you want to see, click generate report again.
The same information and filters go for the expense report and the mileage report. Therefore, these will only be described shortly.
The expense registration report can give you an overview of the distribution of your expenses. Expense cover things such as lunch or minor purchases connected to work.
The mileage registration report will, much like the other reports, give you an overview. This specific report will give you a report on your mileage, meaning where and how much you drive in connection with work. You can also use it to see your mileage allowance for a specific period.
In the storyline you can see a timeline with all the different registrations you have made in a period you choose. Here you can select all the same filters as we ran through before. Besides, you can choose what registration type(s) you want to see (time registration, expense registration, mileage registration and/or photo registration).

Figure 9 – Storyline
In the personal settings you can edit your profile, password, external logins and user log.
In edit profile you can change information such as name, e-mail, language and address.

Figure 10 – personal settings
Some mandatory settings you have to fill out, but some are optional as well. For example, you can add a profile picture if you want to.
The external logins, you can add if you wish to login differently from when you first logged in.
In the user log you can see all the actions you have made in the system.
You can use change organization if you are invited to multiple systems. Its super easy to do, and you don’t even have to log in and out to change organization.
The last item to be reviewed in this guide are TimeGuru’s different support options.
On the frontpage you can easily access all the support options.
There are three different types of support:
The e-learning videos thoroughly reviews the different functions step-by-step and they are easy to follow. You can find a video on every function in the system, leaving you no problems finding what you are looking for.
The user guides are set up like the guide you are reading right now. They will walk you through the different functions and the use of these, without going too much into detail. These guides will give you a good overview of the systems capabilities.
The FAQ are different answers to specific questions that other users have asked us. This is an easy way to get the answers to various questions you mught have, or to learn more about TimeGuru in general.
This is all the functions you can use as a user in TimeGuru. Now, you are ready to let the register your time!
With the smart worksheet you can easily get an overview of the week, regardless if you use pc, tablet or mobile. The time registration can be used simple for flextime and leave, or more advanced for project management and invoices. You can attach a cost and sales price on multiple levels and price regulation is conducted central. It will replace the old price from the selected date in the entire system. Compare actual time with planned time for ongoing optimisation of the company’s performance.
Here you can see how easy it is to register expenses and attach invoices in the worksheet. Expenses are often used if you have paid privately and you need to get the amount disbursed, or if you have a company credit card. It is also possible to select, if it is a customer who needs to pay for the expense.
With photo registration you can add photos to your work. You can use photos to show progress in projects or for quality assurance (before/After) and much more. Photos gives the timeline-reports a little spice, that makes it exciting for your colleagues and leaders to follow up on the project. Through the timeline, it is also possible to follow activities across the system or for each of the projects, customers and employees etc. Photo registration is available via the device’s camera or upload from the photo card-index.
When registering mileage, the start address is automatically filled out with the company address. Likewise, the end address is filled automatically when choosing a customer. when TimeGuru register that start and end date is filled out, the system will calculate the mileage. All inputs can of course be updated manually if you have changes for the automatic information. If you need to register mileage for the same start and end date multiple days in a row, you can use the copy/paste function in the worksheet. Then it will only take a couple of seconds to register mileage.